Monday, September 16, 2013

The Guests May Stay Awhile

The guest room. A for real guest room that a future child won't take over when we decide that it's time for number two. A guest room that has its own bathroom. A guest room that is separate from the upstairs bedrooms and the downstairs "man-cave". A FOR REAL guest room!

Ok so it didn't look all that great when we found it, but we could see endless opportunities for friends and family to come stay. We could see our doors open wide for ministry in our new home and hospitality to be a regular part of our language. The problem, however, was that the carpet needed to be replaced and the room itself was, well, dingey and unwelcoming. 
The guest bedroom/office is located on the basement level, but has a wonderful window that makes it feel like an upstairs room. In addition, there is a third full bathroom just off of this room, making it perfect for guests to have their own space. 
If the closet to the right of the bathroom wasn't filled with our furnace and water heater, this large space would have counted as a 4th bedroom. :) Well, it's going to be OUR 4th bedroom. 

When we moved in, we placed the old farmhouse bed from my Grandparent's house--the same bed I remember climbing on at Great Great Aunt Lena's house, the "big bed" as the cousins all called it--front and center in the room with the bedding from the first house on it. Well, folks, this room was not first priority AND I was lacking in the idea department for the design of this room. "Big bed" was not displayed in all her glory. Sad face.
Not to mention, the ghastly green paint really needed to go. Barf. However, we did have the carpets replaced before moving in, so the furniture was safe from water stains, dirt, and animal urine. :) I know you are all relieved. 

Well, this weekend we had our 4th set of house guests stay over and I had had enough of the unwelcoming guest quarters. I just had to make the change. The first thing we did was pick up some new bedding for our vintage fancy queen of a bed. 

Get ready, because this little "bed in a bag" buy from TJ Maxx was about to turn the room from sad to very glad. :)

I had some leftover paint from doing the master bath, so out came the drop cloths and rollers during nap time and in came a soft grey to lighten things up. "Urban sunrise" from Valspar. 

Notice the scuffs and grease marks on the green? Well, they were soon a figment of my imagination. Come to mama Urban Sunrise.


What a difference! 
I used up the leftover paint and actually need to get a bit more for touch ups, but because I am so excited about this change, I couldn't wait to post about it! 

Big bed, may you induce sweet dreams! 


It may be impossible to truly tell the difference, but now that the green is gone and the bed has its rightful place, this room has already cleaned up and brightened considerably. It's more modern and airy and I find myself stopping to stand in there just to gaze at its beauty quite often already. I does not feel like a basement. I repeat, it does not feel like a basement. Yippee!

Now, the best is still yet to come, my friends. Over the next couple weeks I have big plans for the bathroom and an accent "something" that will take it to a whole new level. :) 

In the meantime, welcome to our little guest suite. We can't wait to show it off as it comes to life very soon. 

Sunday, September 15, 2013

The Living Room

One of the rooms I was most excited about was the upstairs living room. Being the first room you see when you enter the house, I wanted it to be as welcoming as possible. Before we closed, I would spend hours pondering furniture arrangement and paint colors so that I made sure to get it right. 

The paint color wasn't a difficult choice for me, as I planned on using our medium toned greige that we were given (15 gallons that someone didn't end up using) before we moved out of our first house. It was perfect to tackle the high ceilings and blend my love of grey with the fact that we have a large brown sofa. :) 

The first big step to getting the living room done was figuring out how we would place the furniture. We originally thought we would put the brown sectional down in the man cave--and we tried several times to get it down there. Man-cave war wounds...

Needless to say, after the third try and third set of big burley man-folk testing their brains and brawn, we settled with putting it back upstairs and just making it work. 

I wanted to keep the windows as open as possible, but the large sofa just wouldn't fit in the corner underneath the glass block. Next plan: block part of the windows but use the credenza as a sofa table to decorate around it. Success! (I didn't take a picture of it before we painted, so lets get right to the good stuff). 

After the kitchen cabinets were done, it was time to tackle the kitchen and living room walls, as well as down the hallway. 


Don't get me wrong, the before color wasn't bad, but there were spackle spots and dings that needed to be taken care of and, of course, a very red kitchen that needed to leave as soon as possible. 
 
Into the center of the room, went EVERYTHING...and we set off to paint to our hearts content while Dawson slept. Therefore all of the taping and prep work happened during her afternoon naps and painting took place between 8 and 10 or so at night. The first night we tackled the first coat, and followed with the second on night two. 

Lets just say, I was so excited when it was finished, I stayed up a little late pulling tape and putting furniture back in its place. 

Voila! Living room completion! 


As with the kitchen, we still have some odds and ends to take care of. One of these being cutting in around the ceiling once we have a tall ladder. Jagged, old paint border isn't really our thing, but we hardly notice it right now since we have the decor up and it feels like home now. 


All I know is that a little elbow grease and some paint goes a long way in making any house a home worthy of calling your own. We have truly been blessed by this house, the space it offers, and the guests we can welcome! 
 I would say that Dawson has done well making friends with our guests. :) If this doesn't melt your heart, the view of these two squealing and laughing in this very living room sure would. Blessings abound with family and friends in our home! 

Plans for this space include: 
-removing the glass block divider and replacing it with spindles or modern cables, or even plexi glass. 
-updating the light fixtures in entry and dining area
-adding curtains to the large picture windows
-adding a large area rug and coffee table in front of the sofa 
-updating the wood burning fireplace (new tile surround? Built-in bookcases around it? A wall treatment above the mantle?) 

If only the funds were limitless, right? :) 

Monday, September 9, 2013

Orange Be Gone

When you have to wear blinders before entering a room, it's probably safe to say that it needs some work. 

Safety cone orange wasn't the color we would be sticking with for Dawson's room...but we knew this was her room very quickly upon finding this house. Even though the color was atrocious, the wainscoting and size just screamed "this room is perfect for baby girl!" A few things we love about this space are the wood floors that are throughout the upstairs hallway and each bedroom, the wainscoting that I mentioned before, the fact that we can see into the room from ours with both doors open, and the fact that it is about the same size as our MASTER bedroom in the first house. 

But the orange...Had. To. Go. 

So not only did we work like crazy in a single weekend in April to get moved in, we also painted Dawson's room to get it ready for her to inhabit it. I could just imagine how difficult it would be to paint her bedroom while she napped if she were napping in there. ;) In my view, we needed to get her space ready so we could do the rest while she was good to go in a finished room. 

Before a box was unpacked or picture hung, we set to work. 

After moving all of the furniture to the center of the room, we brought in the painting supplies and taped off the wainscoting. In order to be as efficient as possible, Tyler cut in and rolled the Greige on top (It's the same color we used in the kitchen) and I made myself right at home on the floor repainting the white wainscoting to freshen it up. 

Before we brought Dawson home to our beautiful mess of a house, I made her bed and put a few of her decorations up. Afterall, we couldn't have her feeling like she didn't have her own space in a new house that was unfamiliar. :)

On the opposite side of the room, we put her toy shelf and started a "grandparent wall" where she could have pictures of her Grandpa and Grandma, Itzu and Papa, and her Nani. She needs to have them close too. :) 

The dresser was a Craigslist find before she was born. In order to add some whimsey to her pink, green, and vintage, I had Tyler paint this masterpiece to match some of the colors from her fabrics and then I went on the hunt for knobs that were "pretty" but mismatched just for fun. 

The "after" was quite different. Nevermind this is a picture from the first house--we just had a better picture of it in her old nursery. 

All in all, the color no longer requires sunglasses and blends nicely with the rest of the house and Dawson's updated vintage bedroom. I have several projects I would like to complete in there such as some serious closet organization, a reading/play area (we currently don't need one due to the use of the neighboring bedroom as a playroom), and some more frames and grandparent candids on her collage wall. 


The room is strikingly similar to her first nursery, but since she only had that room for about 14 months, I wanted to keep it the same for a while longer. 

What's crazy to me is how much bigger this room is. 


And while I have already changed her curtains and have no picture of her grandparents wall, it is now much more "us" and has made Dawson a cozy space to call her own. 

I love decorating. So so so much. If only I had endless funds so I could do it all the time. :) You guys could very well get sick of me and my house updates. Happy Monday! 

Thursday, September 5, 2013

Cookin' Up Something Nice

House hunting this time around meant that we had a few more items on our "must have" list. A larger, more open kitchen was high on the list, as we tried (most times) unsuccessfully to fit our family into our tiny kitchen before. Our hope was to find a home with a kitchen that could fit a large table filled with our family and friends--one that we could make many memories of fellowship in together. The bonus was that we found one that needed some love. :) 

The Northpoint house is full of cabinet space, but one look at those rose colored 1990's beauties and Tyler and I both saw a fresh, clean white in our future. While we love the looks of the modern dark cabinetry we see in many newer homes, we are both drawn to the light and bright that a couple coats of paint can bring. 

This brings us to one of our first projects: operation "paint the cabinets" was soon underway as our summer vacation began. 
 
Since we would be replacing hardware, step one was removing the doors so that we could lay them flat in the garage and get nice even coats, no drips, and plenty of dry time. You may notice the sweet little gal playing in the noodles and muffin tins on the floor. She was quite a helper during the door removal process. :) (Of course, it was much easier to paint a kitchen WITHOUT the help of a toddler haha). 


There are many helpful tips out there on the best ways to repaint cabinets, but we chose what made sense to us. Therefore, we laid the doors out (front side down to avoid any smudging when flipping them over), did a light sanding to scuff the surface, primed, and painted two coats. The process was long, but well worth the work. One key here is to allow plenty of dry time between coats and when complete. 

I don't have a picture of just the cabinet boxes, but we did the same process. Sand, gentle wipe down to remove dust and grease, prime, then paint 2 coats. To avoid brush strokes, I like to use a small foam roller. :)

The cabinets turned out better than expected--a better finished product than our last house, for sure. 

Add some hardware (no knobs before) and we have a brand new look!


Problem #2: Red, Red waaaalllls. 
I'm sure many of you love a good red wall, but the red just wasn't going to go with my grey, yellow, and white color scheme. So...out with the old and in with the new! 

The high ceilings sure didn't lend to any easy paint job, but we were blessed to already have the paint color of choice on hand and plenty to go around. Gotta love free paint! The color is a greige color--a blend of grey and beige--but I couldn't tell you the exact name since the original owners of this paint had it color-matched. 
We still don't have a tall enough ladder to cut in around the top, but we have one coming soon to finish. In the meantime, however, we have a lovely border to go with our fabulous paint color. Either way...much better than the red. :) So clean! 

 The painted cabinets and walls, as well as some fresh decor have already completely changed the look of our new home. While we still have plans of removing the glass block railings, updating the stove and microwave, finishing the cutting in, and adding a handmade farmhouse table made from barnwood at my grandparent's farm, this beauty is already becoming "ours" and many friends and family have blessed it with their presence. 
 
Lord, we pray that you use this space to be honored in our family and fellowship. May ministry happen here and our family grow closer to one another and closer to you. 

Next up: Family room updates 

Sunday, September 1, 2013

Our "Together" home: At First Glance

In February of last year we had had enough of Tyler driving 45 minutes to and from work AND us driving the same to go to church. It was time to make a switch. We bit the bullet and put our house on the market. 

Little did we know, it would only take a month and a half for a buyer to come our way. First house? SOLD! 

This is the part where we started to worry...you see, the beauty you see above was yet to be found. We were about to be a homeless family of three. (Ok, not really. We could have moved in with Tyler's parents if we needed to). You can imagine, however, our excitement when we found our TOGETHER house! 

Was it the perfect home? Almost! Better yet, it was transformable...and THAT is most important to a couple of amateurs like us. :) 

Since our closing on April 26th, we have been in a whirlwind of settling in, painting, and planning for what we hope for this house. And boy, do we have some grandiose ideas! (Ha, I'd say some of them may be a bit unrealistic, but hey! It's fun to dream!) 

So, without further adeiu, the Northpoint house! 
The living room sits in the open area just inside the front door. High vaulted ceilings and large picture windows with a wood burning fireplace, it's this sunlight-loving girl's dream! Head just up the few stairs to the eat-in kitchen (that just happens to be GINORMOUS compared to the old house). Woo hoo! This girl is in heaven! 

Just off the kitchen is the laundry room, and down the wood-floored hallway are three generous sized bedrooms and two bathrooms. Did I just say TWO bathrooms?! Why yes I did! (Some of you may remember that the first house only had one). 
Dawson's room:
Wainscoting, yes please! Safety cone orange? This was literally the first to go once we were in. ;) 

Playroom/future 2nd baby room: 

Master suite:
Nevermind the previous owner's furniture, this room has quickly become my favorite room in the house. I cannot wait to show you how far it has come. Goodbye stark white dirty walls...helllloooo bold and cozy navy blue! 
Master bath: 

As you walk in the front door you can choose to go up to the kitchen and main living space, or down a few more steps to a landing and the guest room/office and a third full bathroom. 


Finally, on this grand Pre-Reno tour is  the man-cave. On the other side of the stairs leading down to the landing (where you can get to the guest room and the garage) are a small set of stairs leading down into the finished sub-basement or "man-cave". With no windows and the seeming perfect spot of a large tv and lazy-boy, the hubs found his lounge space. ;) 


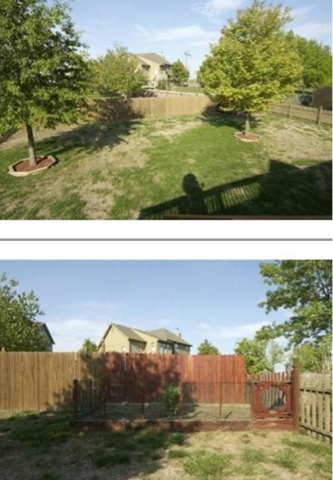
The backyard is just as exciting. Nice and flat, fenced in, and complete with a garden spot, this would be a wonderful place to play outside and make memories. 

Since we moved in just 4 months ago, we have already been hard at work in our new home. Much painting has been done, furniture arranging, and picture hanging. Yet while much has already happened, the journey continues because we have a long list ahead of us. Maybe I'll take you through some of those ideas soon. :) 

For now, it's rest for the teachers who are now back to work--and maybe just enough time for me to put some more ideas in my head and get going again. May the redecorating keep us going as we are ever so thankful for our blessings in this new home!